 EU: Free Shipping starting from €60
 Great customer care

You may have seen it on your Instagram, Pinterest or other social media. Usually, by the end or beginning of the year, one of the resolutions is to crochet or knit a temperature blanket. But what is this?
A temperature blanket is a crafty way to show the temperature changes in a specific place over time. It is like collecting weather data and turning it into a colourful and cosy project. In the end, you get a work of art! Originally these types of blankets are worked to represent a full year, but it is not mandatory. The basis is to record the temperature changes during a specific period and space in your life. You can either make a temperature blanket to just have a daily ritual or to mark a special moment in your life (like pregnancy, marriage year, and so on).
There are many ways and techniques to make a temperature blanket. Each row or section represents each day you are recording, using different colours for different weather conditions - colours based on meteorological events.
Let’s build our own
Start planning, get creative and give it a personal style and a modern or traditional vibe. The colours used each day will correspond to the temperature recorded outside. If you don’t know where to start, check the steps below and start your project today.
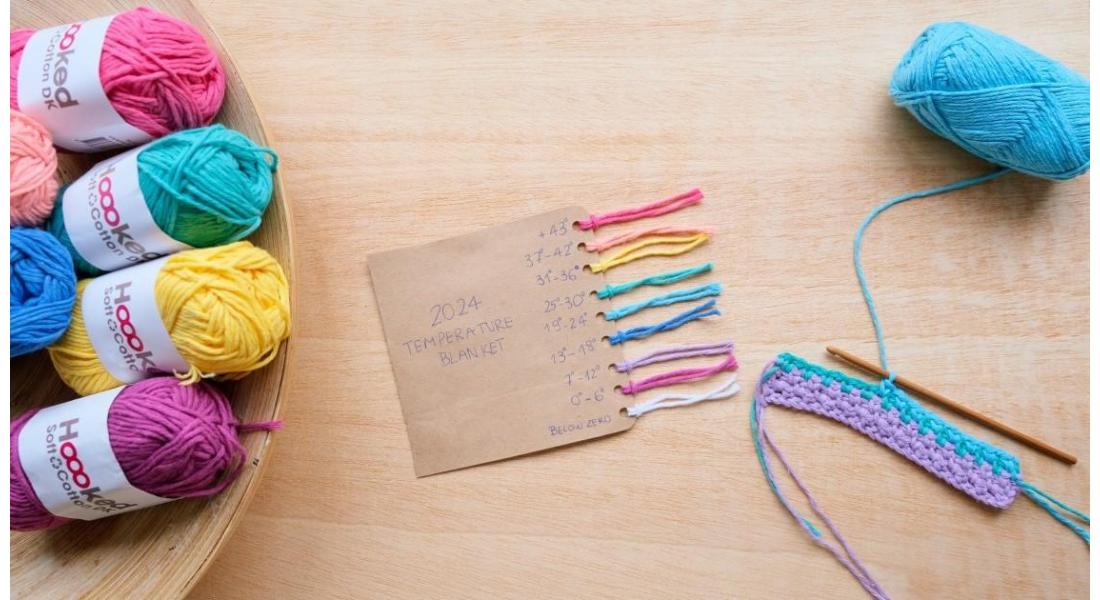
Step 1 - Pick your colours
The first you want to do is make the temperature gauge based on where you are or the place you want to base in your blanket.
If the weather in that place is stable with no significant differences each day you might want to select fewer temperature degrees for the same colour. This way you will have more variety of colours. But if the weather is unpredictable with great differences you can have more temperature degrees in the same colour.
Most blankets are made using a rainbow colour palette but it’s not required. There are no right or wrong answers when choosing the colours for your blanket. You should choose your colour palette according to your style or what you think suits it better, as many colours as you like. If you want to play safe, opt for neutral colours that you know will work well together regardless of position.
Then, you should make a temperature gauge/chart so you can keep track of your choices.
Keep in mind that the more colours in your palette, the more variance you get in your blanket.
Step 2 - Choose your yarn
It’s important to get the right yarn to work with. There are a few factors to consider when selecting the yarn, like fibre content, colour range and yarn weight. You should think about how warm you would like it to be; if the yarn you would like to work with has a nice colour range (so you can have more colour options); if you would like to work faster; have a chunky or thinner and lighter blanket; and other questions you might have.
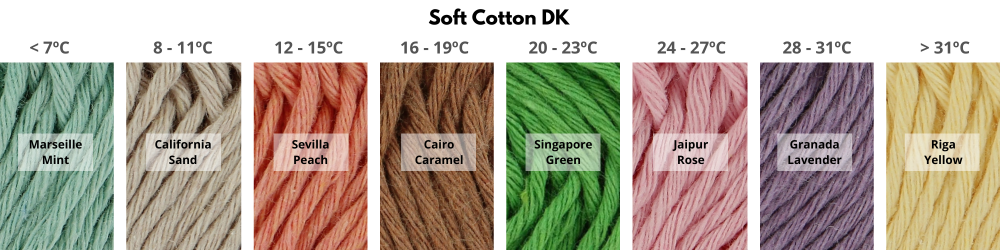
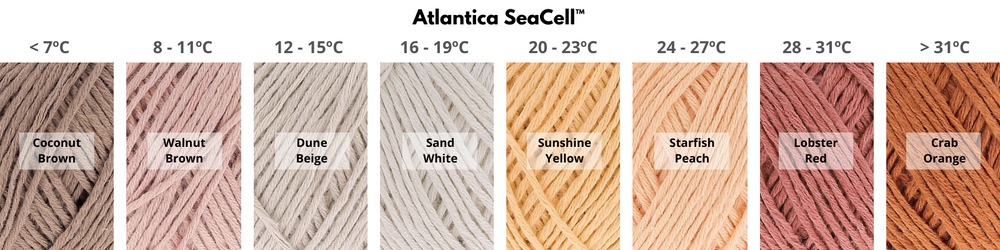
From the Hoooked yarn selection, we suggest Soft Cotton DK, Atlantica, Somen and Eco Barbante Milano as good options for this type of project. All these yarns have recycled cotton in their composition, so you will be doing and handmade blanket, with a sustainable principle.
Don’t forget to swatch! Knowing your gauge and the final measurements you want for your blanket will allow you to define the number of stitches to start your blanket, the number of rows you need to make and an approximation of the amount of yarn.
You can decide to do a big blanket for your couch or bed, or a small blanket, just to keep you cosy when watching a movie!
Plan it before you start.


We share with you the usual measurements for different blankets:
|
Standard Size (approx.) |
|
|
Baby |
75 x 100 cm / 30 x 40 in |
|
Crib |
90 x 130 cm / 36 x 52 in |
|
Throw |
125 x 165 cm / 50 x 65 in |
|
Twin |
180 x 230 cm / 70 x 90 in |
|
Double |
215 x 275 cm / 85 x 108 in |
|
Queen |
230 x 275 cm / 90 x 108 in |
|
King |
280 x 275 cm / 110 x 108 in |
(note this is a guideline for standard blankets)
Step 3 - Choose your design
There are already a lot of temperature blanket designs around. You can choose the one you like the best or, if you are up to it, design your own! You can find traditional and more modern designs that can fit your style and home decor. If your goal is to let the colour palette stand out, you may want to choose a simple pattern. If you think making your blanket might be tiresome (as a year-long project) we suggest you mix things up by using different stitches or trying another type of pattern, like corner-to-corner and granny square.
We selected a few we think would be perfect for this:


Step 4 - Keep track
Be consistent. Write down the temperature over time or look up the weather history for the time and place you chose. Choose between the average, highest or lowest temperature you want to base your blanket in. The average temperature may not suffer great variation, depending on your location, so it might be better to go with the highest or lowest temperature to see greater changes. You can be more ambitious and go for more than one weather factor for each day, to make a more interesting pattern. You can also choose to record how the weather conditions were each day, like sunny, foggy or rainy. It’s up to you!
You can use AccuWeather or other websites to keep track.
Step 5 -Let’s create
After having the data you need, you can start working on your blanket. If you are thinking of making this year’s temperature blanket, you may want to schedule when you will be working on it (daily, weekly or monthly) to keep you motivated and working when you want.
The typical temperature blanket has one row for each day but, as we said before, you can try other stitches and designs, to mix temperatures (low-high, different places), to work with moods, activities or conditions instead of temperature.
If you want you can also apply the concept of the temperature blanket to other projects, like garments, home decor or amigurumi.
Be creative. Be bold. Be yourself.
A useful website to help you along the way: Temperature Blanket
We would love to see what you’ll make! Share your projects with us by tagging @hoooked.zpagetti and using the hashtag #gethoooked.


