 EU: Free Shipping above €99
 Great customer care

Summer of '69 Bucket Hat
They have been trending on social media for a while now: crochet bucket hats. In the swinging sixties and in the 1990’s these crochet summer hats were already a big hit, but just like other fashion trends: they are coming back. This summer you cannot be seen without one! A crochet bucket hat is easy to make yourself and it is also a fun poolside project. Lotte from @lotsontheway made a free crochet pattern for all ages. This crochet pattern for a hat is easy to adapt to the size of your head. This crochet pattern for a bucket hat is perfectly do-able for anyone who is familiar with the basics of crochet and pattern reading. Have fun with this free pattern for a perfectly sized DIY bucket hat! Do not forget to share your crochet bucket hat on social media by tagging us (@hoooked.zpagetti).
Materials:
-
1 x 100g. Somen (up to 2 x 100g. Somen for size men s/m)
Stitches (UK terms):
Chain (ch)
Slip stitch (sl st)
Double crochet (dc)
Increase
Sizes:
- Baby 37-43 cm/14,5”-16,9” diameter approx. 12,7 cm/5,0”
- Toddler 49-52 cm/19,3”-20,5” diameter approx. 16,0 cm/6,3”
- Child 52-54 cm/20,5”-21,3” diameter approx. 17,0 cm/6,7”
- Teenager 52-55 cm/20,5”-21,6” diameter approx. 17,5 cm/6,9”
- Women s/m 55-57 cm/21,6”-22,4” diameter approx. 18,0 cm/7,0”
- Men s/m 57-60 cm/22,4”-23,6” diameter approx. 18,5 cm/7,3”
Step 1: Start by measuring your head
Measure the head size by wrapping a measuring tape around the head. Follow the pattern until you reach the desired size.
Notes:
- Do not close the round with a sl st to avoid a seam. Place a stitch marker in the first stitch of the round. Move the stitch marker after each round.
- Increase: dc 2 in one stitch.
- Row 22a and 22b. Work two times in the same row.
- It is not necessary to make row 22b, feel free to skip this row if the technique of crocheting between the stitches is too difficult. Follow the pattern for the top part of the bucket hat until you reach the required diameter (see the above-mentioned size info). Continue with the side pattern, followed by the brim.
Step 2: Crochet the top to fit your size
Start with a magic ring, or chain 2.
- Ch 6 in the magic ring, or in the second chain from the hook (6).
- Dc 1 in every stitch (12).
- *Dc 1, increase*, repeat between ** (18).
- *Dc 2, increase*, repeat between ** (24).
- *Dc 3, increase*, repeat between ** (30).
- Dc 2, increase, *dc 4, increase*, repeat between **, end the row with dc 2 (36).
- *Dc 5, increase*, repeat between ** (42).
- Dc 3, increase, *dc 6, increase*, repeat between **, end the row with dc 3 (48).
- *Dc 7, increase*, repeat between ** (54).
- Dc 4, increase, *dc 8, increase*, repeat between **, end the row with dc 4 (60).
- *Dc 9, increase*, repeat between ** (66).
- Dc 5, increase, *dc 10, increase*, repeat between **, end the row with dc 5 (72).
- *Dc 11, increase*, repeat between ** (78).
- Dc 6, increase, *dc 12, increase*, repeat between **, end the row with dc 6 (84).
- *Dc 13, increase*, repeat between ** (90).
- Dc 7, increase, *dc 14, increase*, repeat between **, end the row with dc 7 (96).
- *Dc 15, increase*, repeat between ** (102).
- Dc 8, increase, *dc 16, increase*, repeat between **, end the row with dc 8 (108).
- *Dc 17, increase*, repeat between ** (114).
- Dc 9, increase, *dc 18, increase*, repeat between **, end the row with dc 9 (120).
- *Dc 19, increase*, repeat between ** (126).
Make more rows if needed. Increase with 6 stitches in every new row.
Step 3: Crochet the sides
22a. Dc 1 back loop only in every stitch, ch 1, turn.
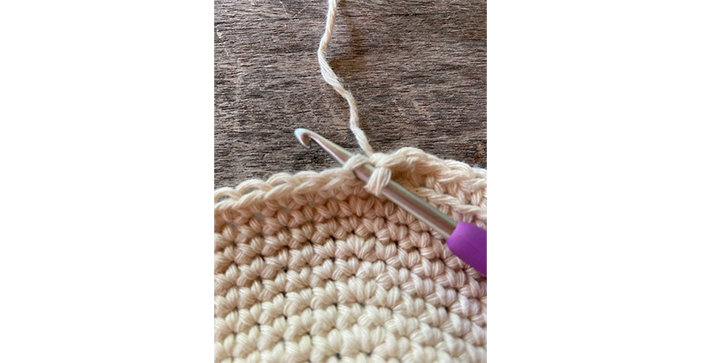
22b. Sl st between the dc stitches of row 22a, close the round with a sl st in the first sl st of this row, ch 1, turn.
23. Dc 1 in every stitch.
There might be a small gap between the beginning and the end of row 23, just crochet on with the next round, pull the yarn tight and the gap will close.
24 – 36. Dc 1 in every stitch.
Make more or less rows if you would like to make the side bigger or smaller.
End the side with the pattern instructions of row 37.
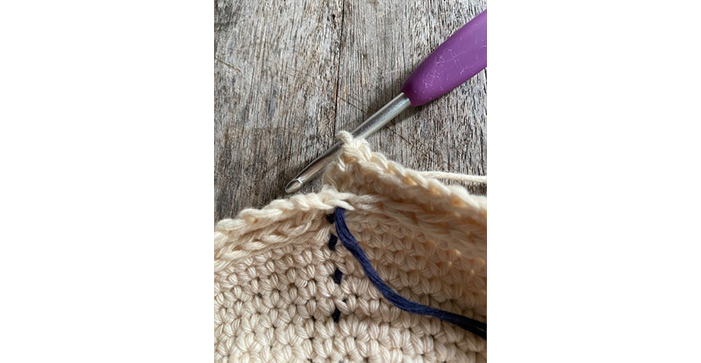
37. Dc 1 back loop only in every stitch.
Step 4: Crochet the brim
38. *Dc 4, increase*, repeat between **, dc in the remaining stitches.
If you prefer a less weavy brim, do not increase in row 39, but dc in every stitch.
39. *Dc 4, increase*, repeat between **, dc in the remaining stitches.
Follow the pattern until you have reached the desired size. Make more or less dc rows if you like a bigger or smaller brim. End the brim with the pattern instructions of row 48.
40 – 47. Dc 1 in every stitch.
48. Sl st in every stitch. Fasten off and weave in all ends.
Variations:
Embroider, or crochet one or more flowers on your bucket hat, or wrap a ribbon around it.