 EU: Free Shipping starting from €60
 Great customer care

Spooky-Cute Halloween DIY: Yarn Ghosts
Halloween is the season where creativity meets spookiness, and what better way to celebrate than with handmade decorations? Instead of relying on shop-bought items, you can create charming, eco-friendly, and personalised crafts right at home. One of the best ways to do this is by using Hoooked yarns, a sustainable and versatile choice for all your Halloween DIY projects.
Our favorite? Little yarn ghosts! They’re adorable, budget-friendly, and a great way to use up leftover yarn scraps. Plus, you can hang them on your front door, string them into a garland, or even turn them into keychains to carry a bit of Halloween spirit everywhere you go.
Here’s how to make your own!
Why Choose Hoooked Yarns for Halloween Crafts
Eco-friendly and sustainable Halloween decor
Halloween is often filled with plastic decorations that end up in landfill. Hoooked yarns, made from recycled textiles, offer a greener alternative. By choosing yarn-based crafts, you’re reducing waste while creating reusable, long-lasting decorations.
Budget-friendly and versatile yarn projects
With just a few balls of yarn, you can make multiple decorations; from ghosts and pumpkins to garlands and keyrings. It’s a cost-effective way to decorate your home without overspending.
Perfect for beginners and children
Yarn crafts don’t require advanced skills. Even children can help with wrapping, tying, or decorating, making these projects perfect for family crafting nights.


Spooky-Cute Yarn Ghosts: A Halloween Classic
Nothing says Halloween quite like a ghost! And with yarn, you can create versions that are more adorable than terrifying.
What you'll need:
- Hoooked Eco Barbante (any color, but we love the classic white)
- Odyssey Lurex in Lunar Eclipse (for a little sparkle)
- Scissors
- A book (to wrap the yarn around)
- Optional: a metal keyring if you’d like to make a ghost keyring


Step-by-Step Guide: Making Yarn Ghosts
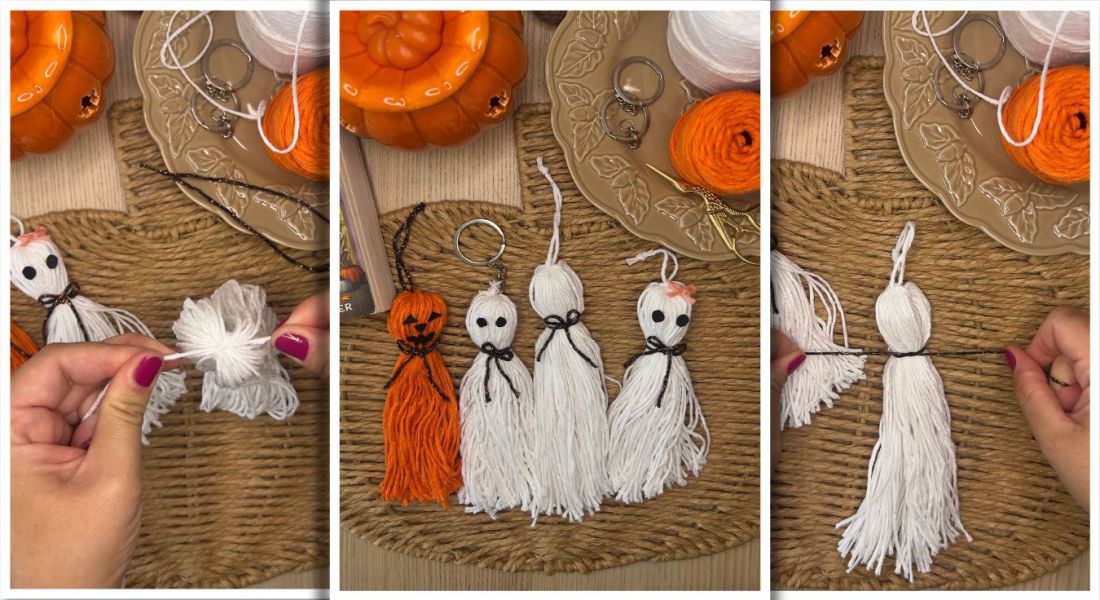
Step 1: Wrap & tie
Wrap the Eco Barbante yarn around a book until you have a thick bundle. Slide it off gently and tie a piece of yarn around the top—this forms the ghost’s head.
Step 2: Snip the ends
Cut through the loops at the bottom so the strands hang loose, just like a ghost’s body.
Step 3: Add some sparkle
Take a strand of shiny Odyssey Lurex in Lunar Eclipse and tie it around about two fingers down from the top to shape the head.
And just like that: you’ve got your ghost!
Time to decorate
This is where the fun begins:
-
Glue on felt eyes or cut tiny shapes for a mouth.
-
Tie on a mini yarn bow to make your ghost extra cute.
-
Want a pumpkin ghost? Switch to Eco Barbante in Tangerine or Brick and glue on jack-o’-lantern eyes, nose, and a spooky smile.
Bonus idea: Ghost keyring
If you don’t want to say goodbye to your ghost after Halloween, attach a metal keyring to the top knot. It makes a playful (and surprisingly practical) keyring!


What’s Next?


Whether you’re decorating your living room, making a DIY garland for your porch, or just looking for a quick craft with children, these yarn ghosts are simple, charming, and guaranteed to get you into the Halloween spirit.
We’d love to see your spooky creations! Share your yarn ghosts with us on social media and don’t forget to tag us.
And if you need yarn for your next Halloween project, check out our full range!


